Ordering a bathroom vanity online seemed smart at the time. Good price, nice clean lines, exactly the width we measured for. When it arrived and we got it in place during the primary bath reno, I immediately knew we’d made a mistake. The proportions were off, the height wasn’t quite right for our family, and the storage layout didn’t work with how we actually use the space. Instead of sending it back and delaying the whole project, we made it work. This is the full story of that wrong vanity and the detail-level fixes that saved it.
The Original Plan vs. Reality
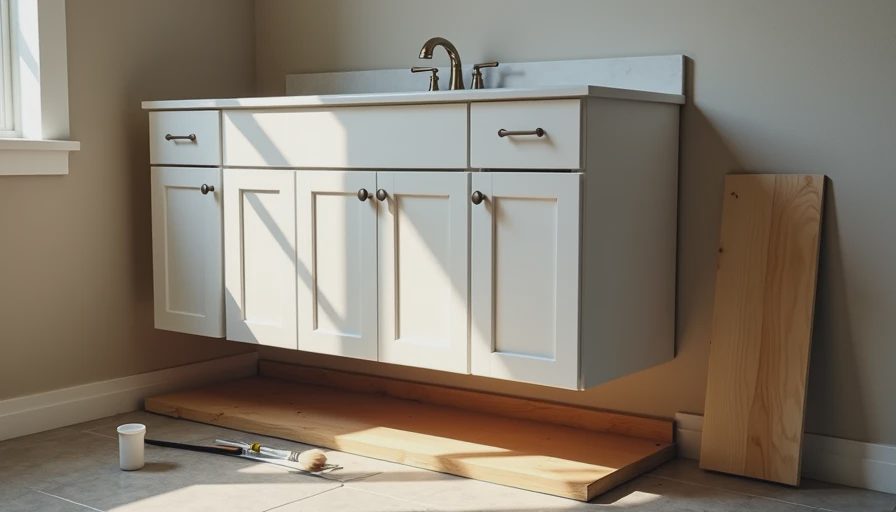
We wanted a 36-inch single-sink vanity with good storage and a quartz top. The one we chose looked perfect in photos — modern shaker-style doors, soft-close drawers, and a clean white finish. Measurements checked out on paper. We were excited when it arrived.
Then we set it in the freshly prepped bath. The width was technically correct, but it felt too wide for the narrow room once the new shower was in. The counter depth made the room feel cramped when the kids were running around, and the drawer configuration wasted space for the tall bottles and kid bath toys we actually needed.
Not everything needs to cost more. Some things just need to be thought about more — preferably while standing in the actual room with the actual fixture in place.
The Specific Problems We Faced
Height was too low for comfortable use by adults (especially with my back).
Toe kick was too shallow, making it hard to stand close while brushing teeth.
Drawer layout was inefficient — big open space at the bottom that became a catch-all mess.
No overhang on the sides, which made the whole unit look stuck against the walls.
Sending it back would have cost restocking fees plus another 4-6 week delay. With two small kids and an already disrupted house, we decided to adapt.
How We Made the Wrong Vanity Work
We turned the mistake into a custom-feeling solution with a few targeted fixes:
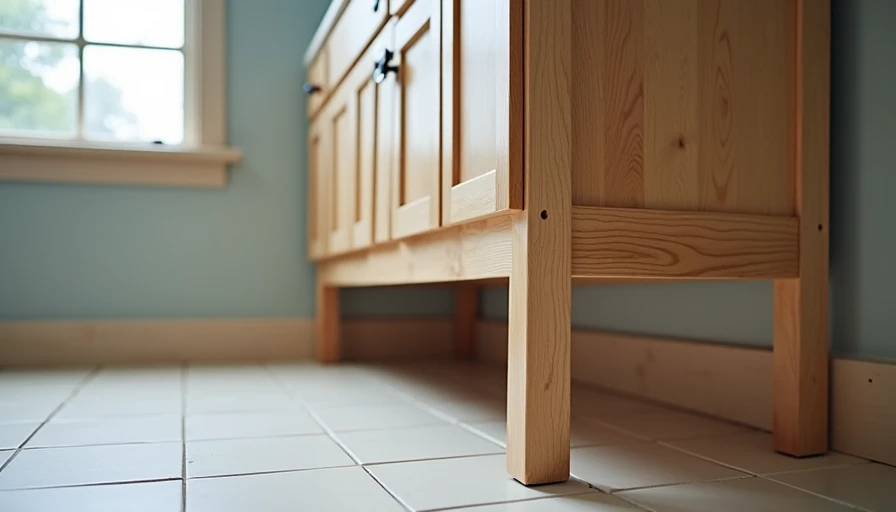
Added a custom base platform (2x4s and plywood, painted to match) to raise the height by 3 inches. This gave us better ergonomics and a deeper toe kick.
Built side returns with simple trim and caulk to create the illusion of a slight overhang and cleaner lines against the walls.
Reconfigured the interior storage by adding removable dividers and a couple of cheap pull-out baskets for kid stuff.
Upgraded the hardware with the same matte black pulls we used elsewhere to tie it into the overall design.
Total additional cost: around $140 in lumber, paint, and hardware. A weekend’s work.
Budget Breakdown: Mistake Turned Reasonable
Original vanity purchase: $1,240
Return/shipping if we sent it back: ~$280 (avoided)
Fix materials and labor (us): $140
Final effective cost: Still under $1,400 for a now-customized piece.
Much better than eating the restocking fee and waiting for a replacement.
How It Looks and Functions Years Later
Almost four years on, you’d never know it started as the “wrong” vanity. The raised base makes it comfortable for both Megan and me. The kids can reach the sink with a small step stool. Storage works well enough for daily life. It blends seamlessly with the tile and lighting we chose.
The lesson stuck with me: very few renovation mistakes are truly fatal if you’re willing to iterate.
What I’d Do Differently Next Time (and Advice for You)
Mock it up in the space with cardboard or tape before ordering.
Stand in the room and physically test heights and clearances with the whole family.
Measure for real use, not just code minimums — include kid step stools, towel piles, etc.
Buy with return policy in mind but assume you’ll make it work instead.
Focus on adaptable features — things you can modify later.
This experience is pure The Detail category material. The micro-adjustments that turn a wrong purchase into something that feels intentional. It reinforced that good design in a family home is about solving actual problems, not just picking pretty things.
We still smile about the “wrong vanity” story. It’s now one of the most used and appreciated parts of the bath. Proof that thinking through solutions after a mistake often leads to better outcomes than perfection on the first try.
If you’ve ever bought the wrong fixture or piece of furniture for a reno, you’re in good company. The key is refusing to let it stay wrong. Make it work, document the process, and move forward.
Next in The Detail I’ll talk about how I learned to stop worrying and love flat-pack cabinets. Until then, if something in your house feels a little off, take another look. A few small changes might turn it into exactly what you needed.
— Ethan

No letters yet — be the first to write.